Configuring OAuth2 for the Appliance API
The management API of the appliance can be secured with OAuth2/OIDC. This guide explains how to achieve this for Auth0 and Azure AD.
The appliance supports two OAuth2 token grant flows:
OAuth2 Authorization Code Grant Flow
This flow is designed for direct interaction with a web application. In this case, the Anapaya appliance is the web application and the user accesses the appliance management UI with a browser (client). The appliance automatically redirects the user to the configured identity provider to log in and validates the JWT issued by the identity provider.
OAuth2 Client Credentials Grant Flow
This flow is designed for machine-to-machine interactions, e.g., if a daemon process wants to interact with the appliance API. The process authenticates itself at the identity provider with client ID and client secret and then gets an access token. The access token is then passed to the Anapaya appliance and validated. A user first needs to register the application with the identity provider before it can authenticate itself to the appliance API.
Note
It’s also possible to configure a different tool, e.g. a CLI program with the Authorization code grant flow, the tool would then do the redirect flow and in the end just send the token to the appliance. For this case, it is enough to configure the token verification keys in the appliance, as described in the client credentials flow sections.
Auth0
Authorization Code Flow
Create an Auth0 application by following the Auth0 docs, use
Regular Web Applicationsas the type.Create the
appliance/readerandappliance/writerroles, such that users can be assigned the different roles. For this follow the Auth0 docs to create the following two roles:appliance/reader: For read access to the appliance API.appliance/writer: For read and write access to the appliance API.
Tip
appliance:readerandappliance.readerare aliases forappliance/readerand can be used interchangeably. The same applies toappliance:writerandappliance.writer.Assign the roles to the users which should have the respective roles, following the Auth0 docs.
Create an action to attach the user roles to the issued JWTs, by following the Auth0 docs. Use
Login / Post Loginas the trigger. In the editor, fill in the following code:exports.onExecutePostLogin = async (event, api) => { if (event.authorization) { api.idToken.setCustomClaim("https://anapaya.net/roles", event.authorization.roles); } };
This will set the roles in the
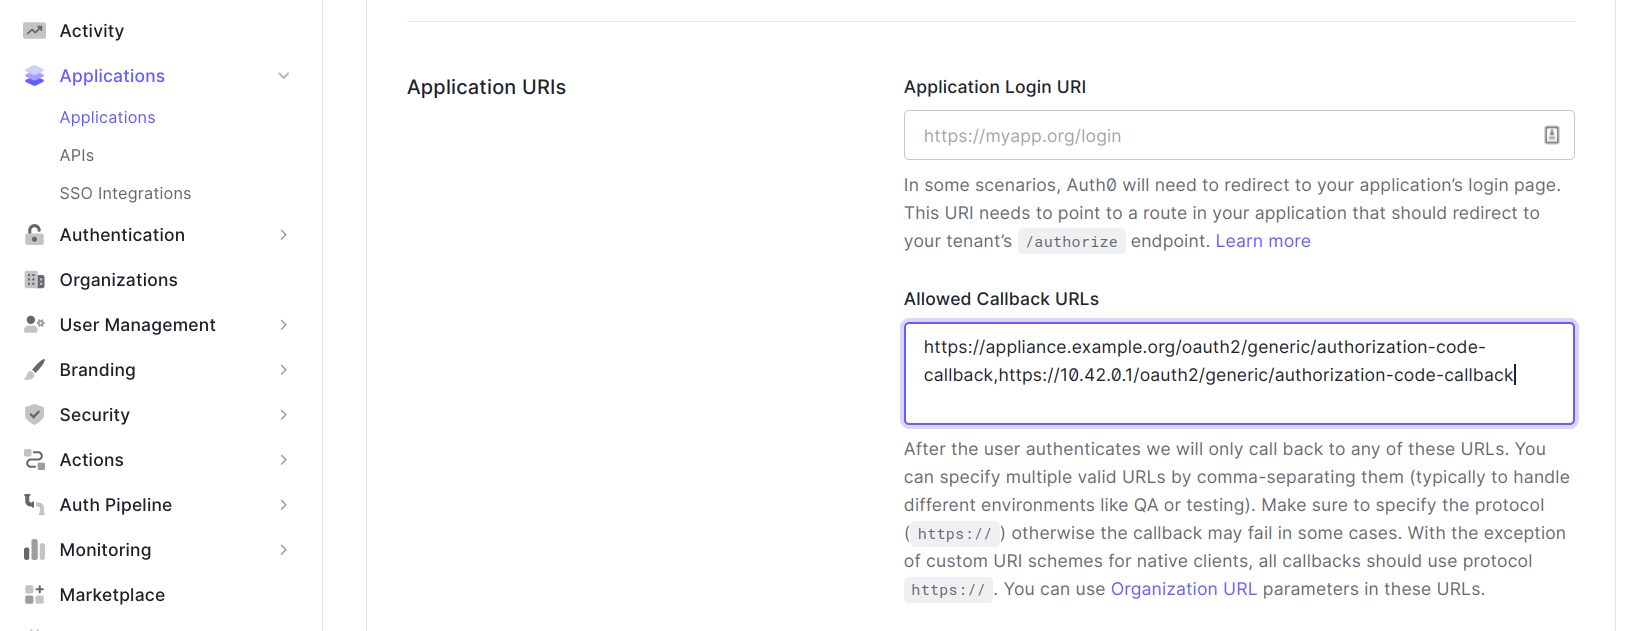
https://anapaya.net/rolesclaim in the ID token.Configure the allowed callback URLs on Auth0. To do this, go to the application that was created previously and add the URL of your appliance in the
Allowed Callback URLsfield. The URL should be the following:https://<appliance_address>/oauth2/generic/authorization-code-callbackwhere<appliance_address>needs to be replaced with the actual address of the appliance. For example, if you have a DNS entry for an appliance with nameappliance.example.orguse the following URL:https://appliance.example.org/oauth2/generic/authorization-code-callback. If you don’t have a DNS entry you can use the IP address of the appliance, e.g., for an appliance with management IP10.42.0.1use the following URLhttps://10.42.0.1/oauth2/generic/authorization-code-callback.Note
You can specify multiple callback URLs by separating them with
,. This allows you to reuse the same Auth0 application for multiple appliances.The configuration of the Auth0 callback URLs looks as follows for the two examples above:
Extract the configuration from the Auth0 application created in the previous step. Open the application by clicking on it in the applications list. This should now show the configuration for the application as follows:

From this settings page, you can extract and deduce the following information needed to configure the appliance:
base_auth_url: Extracted from the domain. In the screenshot above it ishttps://anapaya.eu.auth0.com/.client_id: Copied from theClient IDfield. In the screenshot above it isZFFVg48UHGZ4Wvm8IUOu28R61hTo8VVpclient_secret: Copied from theClient Secretfield.id: Can be chosen freely, e.g.auth0.type: Has to beGENERICfor Auth0.
For the value of the
metadata_url, scroll to the bottom of the settings page and open theAdvanced Settingssection. There open theEndpointstab. The value is then visible in theOpenID Configurationfield: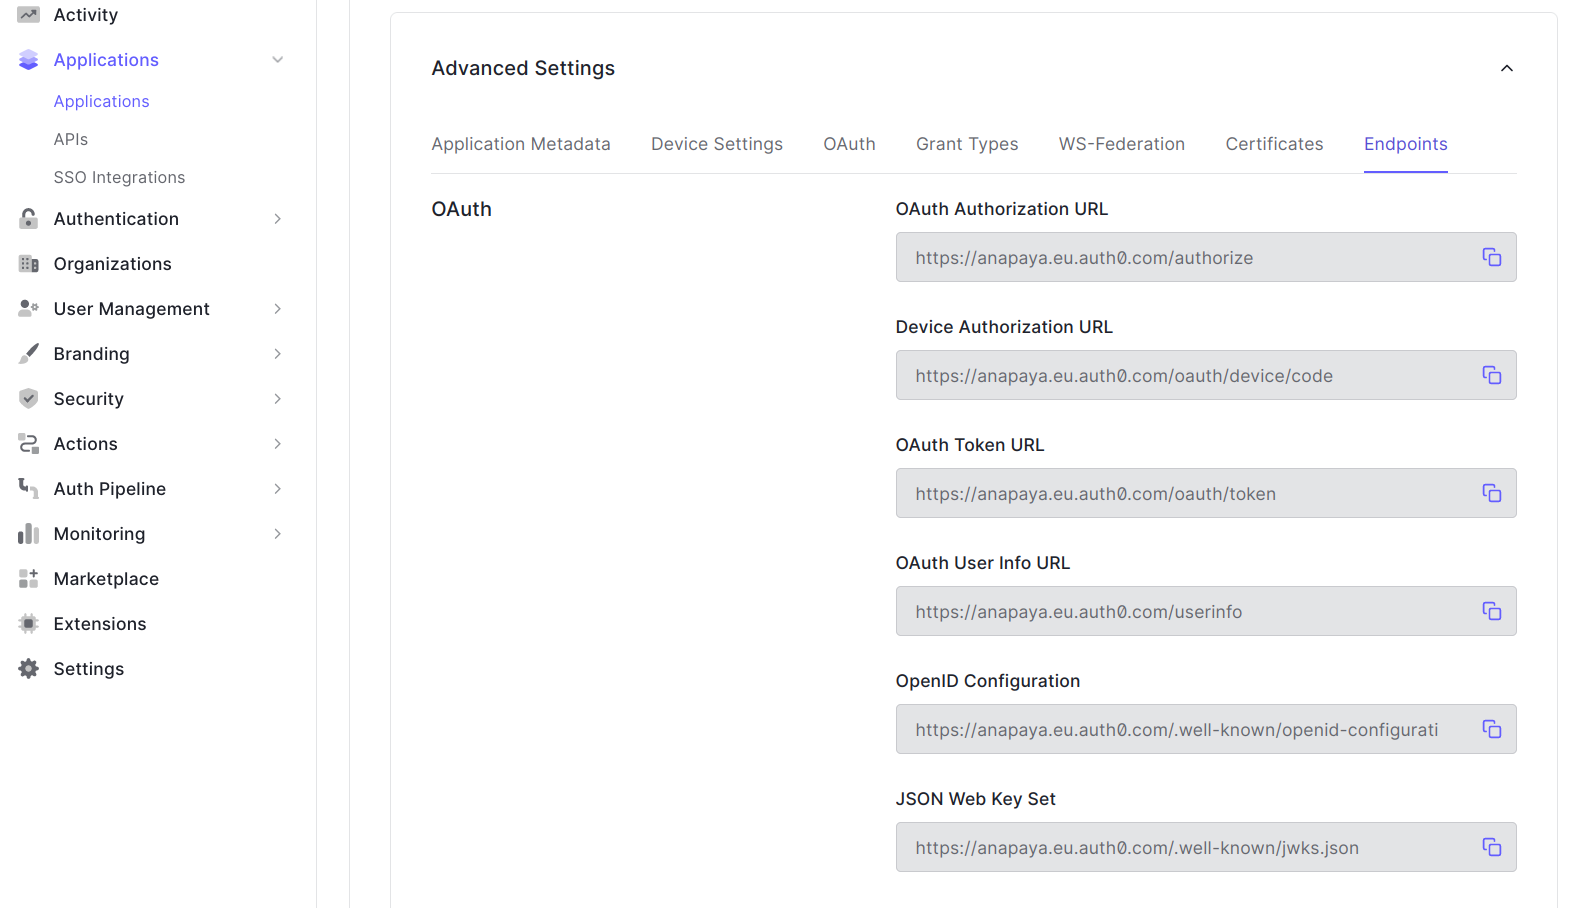
Provision the
client_secretto the appliance:# interactive prompt to enter the client secret retrieved in the previous step appliance-cli secrets add oauth-client-secret@1
Please see Secret Management for more information on how to provision a secret and then reference it in the configuration.
Fill the appliance configuration with the data extracted in the previous step. The
oauthpart of the appliance configuration should look as follows, for the configuration extract above:{ "oauth": { "enabled": true, "identity_providers": [ { "base_auth_url": "https://anapaya.eu.auth0.com/", "client_id": "ZFFVg48UHGZ4Wvm8IUOu28R61hTo8VVp", "client_secret_ref": "oauth-client-secret@1", "id": "auth0", "metadata_url": "https://anapaya.eu.auth0.com/.well-known/openid-configuration", "type": "GENERIC" } ] } }
Deploy the configuration. The API will now only allow logged in users. To verify this, open a browser and type the URL of the appliance you just configured, e.g.
https://appliance.example.org/.Warning
Deploying a wrong configuration can potentially lock you out of the API. It is advised to temporarily also configure basic authorization as a fallback if the OAuth configuration doesn’t work.
Client credentials flow
Follow the Auth0 docs to create an API for the appliance. As signing algorithm you need to choose
RS256;HS256is not supported by the appliance. An API is needed to be able to create a Machine to Machine application.Create an application according to the description on the Auth0 docs, use
Machine to Machine Applicationsas the type and connect it to the API created in the previous step.Add the roles of the application to the application metadata in the Advanced Settings section of the application:
Note
The Anapaya appliance supports the following two roles:
appliance/readerfor read-only accessappliance/writerfor read-write access
Multiple roles can be specified by separating them with a
,.Tip
appliance:readerandappliance.readerare aliases forappliance/readerand can be used interchangeably. The same applies toappliance:writerandappliance.writer.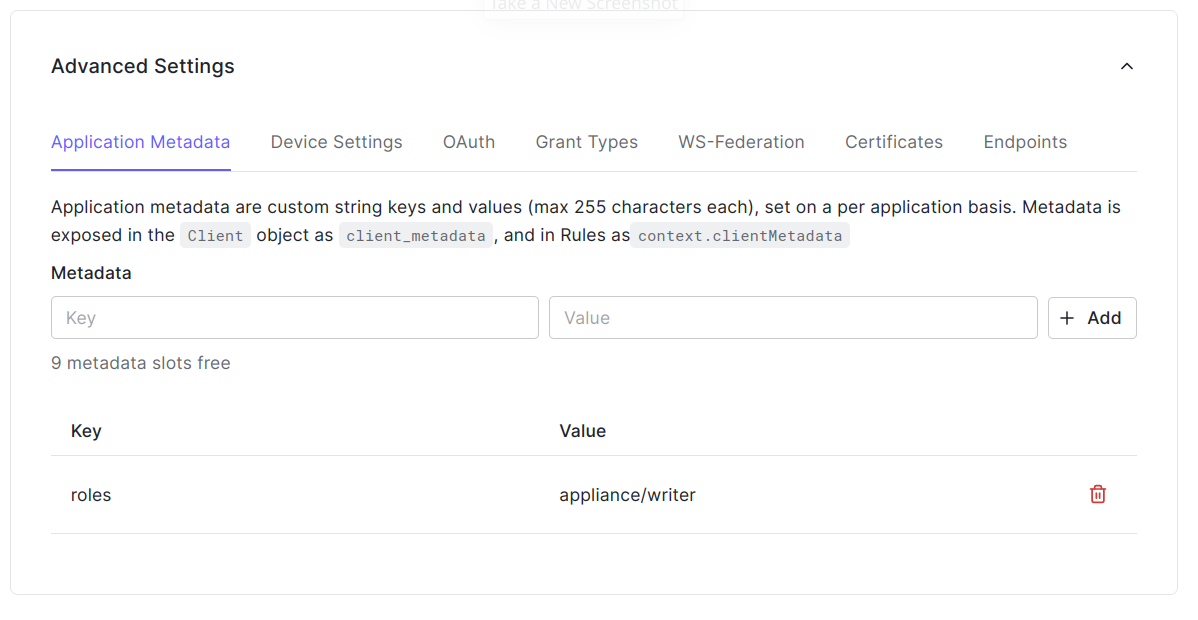
Create an action to add the roles from the metadata into the issued JWT, by following the Auth0 docs. Use
M2M / Client Credentialsas the trigger. Use the following code for the action. It extracts the roles from the metadata and adds them to the JWT as a claim:exports.onExecuteCredentialsExchange = async (event, api) => { if ("roles" in event.client.metadata) { api.accessToken.setCustomClaim("https://anapaya.net/roles", event.client.metadata["roles"].split(",")); } };
Determine the JWKS endpoint for your Auth0 organization. Find the JSON Web Key Set field in the Advances Settings section of the Auth0 application under the Endpoints tab.
Configure the appliance with JWKS URL determined in the previous step. Given the URL
https://anapaya.eu.auth0.com/.well-known/jwks.jsonthe following appliance configuration should be applied:{ "oauth": { "enabled": true, "token_verification_keys": [ { "id": "auth0_keys", "jwks_url": "https://anapaya.eu.auth0.com/.well-known/jwks.json" } ] } }
Note
For testing it can be useful to go to the Quick Start tab of the Application in Auth0. There you will find an example
cURLcommand that you can use to test against the configured appliance.Warning
Deploying a wrong configuration can potentially lock you out of the API. It is advised to temporarily also configure basic authorization as a fallback if the OAuth configuration doesn’t work.
Configure your application to fetch tokens from Auth0 and supply them in the header when communicating with the Anapaya appliance API.
Azure AD
Authorization code flow
Create an application in Azure AD by following the documentation on learn.microsoft. As redirect URL set the redirect URL of your appliance, it must have following form:
https://<appliance_address>/oauth2/azure/authorization-code-callbackwhere<appliance_address>needs to be replaced with the actual address of the appliance. For example, if you have a DNS entry for an appliance with nameappliance.example.orguse the following URL:https://appliance.example.org/oauth2/azure/authorization-code-callback. If you don’t have a DNS entry you can use the IP address of the appliance, e.g., for an appliance with management IP10.42.0.1use the following URLhttps://10.42.0.1/oauth2/azure/authorization-code-callback. As application type select Web.In the last step of the registration you will create a client secret. Make sure to remember its value as this will be used in the Anapaya appliance configuration as the
client_secretfield.Add app roles according to the learn.microsoft docs. Select between the following two roles for the value:
appliance/reader: For read-only access to the appliance API.appliance/writer: For write-write access to the appliance API.
Furthermore, ensure that the Allowed member types is set to Users/Groups.
Tip
appliance:readerandappliance.readerare aliases forappliance/readerand can be used interchangeably. The same applies toappliance:writerandappliance.writer.Assign roles to users by following the learn.microsoft guide.
Extract the required information to configure OAuth on the appliance. For this open the Azure Portal, click on Azure Active Directory, on the left under the Manage section click on App registrations, then select the previously created app on the right side. This should give you an overview similar to this:
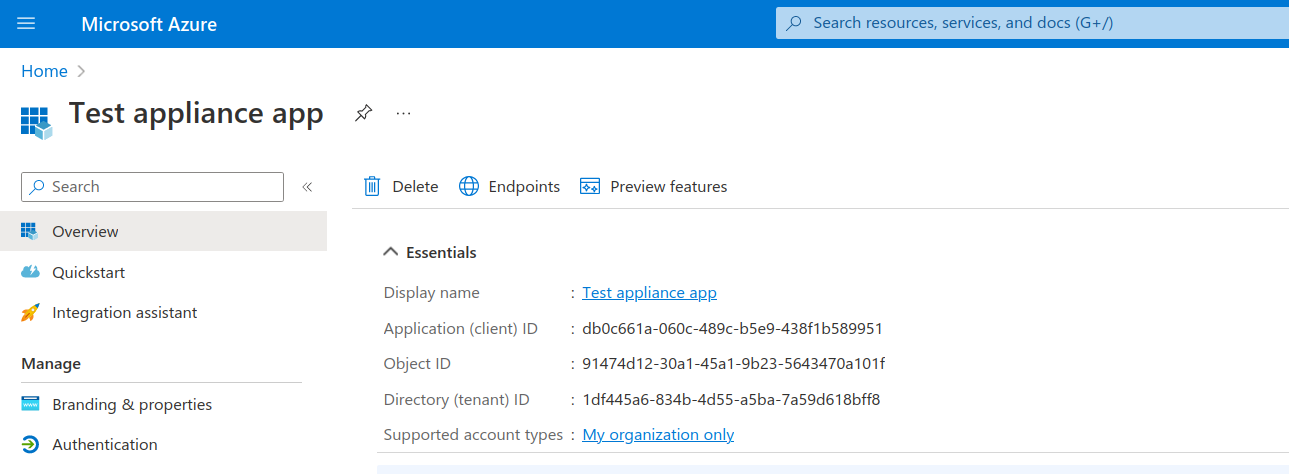
From this overview you can deduce the OAuth configuration of the appliance:
Application (client) ID is the
client_idfield in the configuration.Directory (tenant) ID (if present) is the
tenant_idfield in the configuration.The
client_secretshould be filled with secret that you created during the initial registration of the app.
Given the overview from the image above, the following configuration can be deduced:
{
  "oauth": {
    "enabled": true,
    "identity_providers": [
      {
        "client_id": "db0c661a-060c-489c-b5e9-438f1b589951",
        "client_secret": "<secret hidden>",
        "tenant_id": "1df445a6-834b-4d55-a5ba-7a59d618bff8",
        "id": "azure",
        "type": "AZURE_AD"
      }
    ]
  }
}
Deploy the appliance configuration.
Warning
Deploying a wrong configuration can potentially lock you out of the API. It is advised to temporarily also configure basic authorization as a fallback if the OAuth configuration doesn’t work.
Client credentials flow
Register a new application by following the documentation on learn.microsoft. Note that there is no need to set any redirect URL.
Add app roles according to the learn.microsoft docs. Select between the following two roles for the value:
appliance/reader: For read-only access to the appliance API.appliance/writer: For write-write access to the appliance API.
Furthermore, ensure that the Allowed member types is set to Applications.
Tip
appliance:readerandappliance.readerare aliases forappliance/readerand can be used interchangeably. The same applies toappliance:writerandappliance.writer.Assign the role to the application by following the learn.microsoft docs.
Validate that you can get JWTs according to the documentation on learn.microsoft.
Note
The steps above require a scope value. To get it go to App registration on the Azure portal, click on Manage -> Expose an API, and at the top extract Application ID URI. If there is no URI you have to create one.
Validate the JWT from the previous step contains the desired roles. You can use jwt.io for this.
Determine the JWKS URL for your Azure instance. Open the App registration in the Azure portal and select Overview -> Endpoints. Copy the value from the field OpenID Connect metadata document (it should look similar to
https://login.microsoftonline.com/1df445a6-834b-4d55-a5ba-7a59d618bff8/v2.0/.well-known/openid-configuration). Open the URL in the browser. This should provide you with a JSON file that contains thejwks_urifield. copy the value of this field (e.g.,https://login.microsoftonline.com/1df445a6-834b-4d55-a5ba-7a59d618bff8/discovery/v2.0/keys). Use this URL to configure the appliance in the next step.Configure the Anapaya appliance by adding the
jwks_urivalue extracted above into thejwks_urlfield under thetoken_verification_keysfield. The configuration should look as follows:{ "oauth": { "enabled": true, "token_verification_keys": [ { "id": "azure_keys", "jwks_url": "https://login.microsoftonline.com/1df445a6-834b-4d55-a5ba-7a59d618bff8/discovery/v2.0/keys" } ] } }
Deploy the appliance configuration. The appliance will now successfully validate the JWTs issued by Azure.
Warning
Deploying a wrong configuration can potentially lock you out of the API. It is advised to temporarily also configure basic authorization as a fallback if the OAuth configuration doesn’t work.